I saw the newsflashes this afternoon about how Costco had just had a stellar November and beat analyst expectations. This despite their decision to stay closed on Thanksgiving day and bucking the trend established by their competition. Bravo, Costco; I’m glad to be a shareholder and a part of your ‘extended’ family.

Costco came to the Des Moines metro about ten years ago, opening its warehouse in the newest commercial district around the Jordan Creek mall. My dad, a retired worker keeping himself busy working at a local grocer decided to give employment there a try. I remember his interview process well, and he was hired as temporary staff over the holidays. Each time we spoke that winter, I heard things from him about this employer that were different than any other in his prior life. He had spent a majority of his life working at the US Embassy in New Delhi, India and had risen from a low wage job to a fairly critical position. Once retired, he came to Iowa and has lived and worked here ever since. Despite his experiences working for the embassy, the benefits, the management style, and the work ethic expected and developed seemed remarkable.
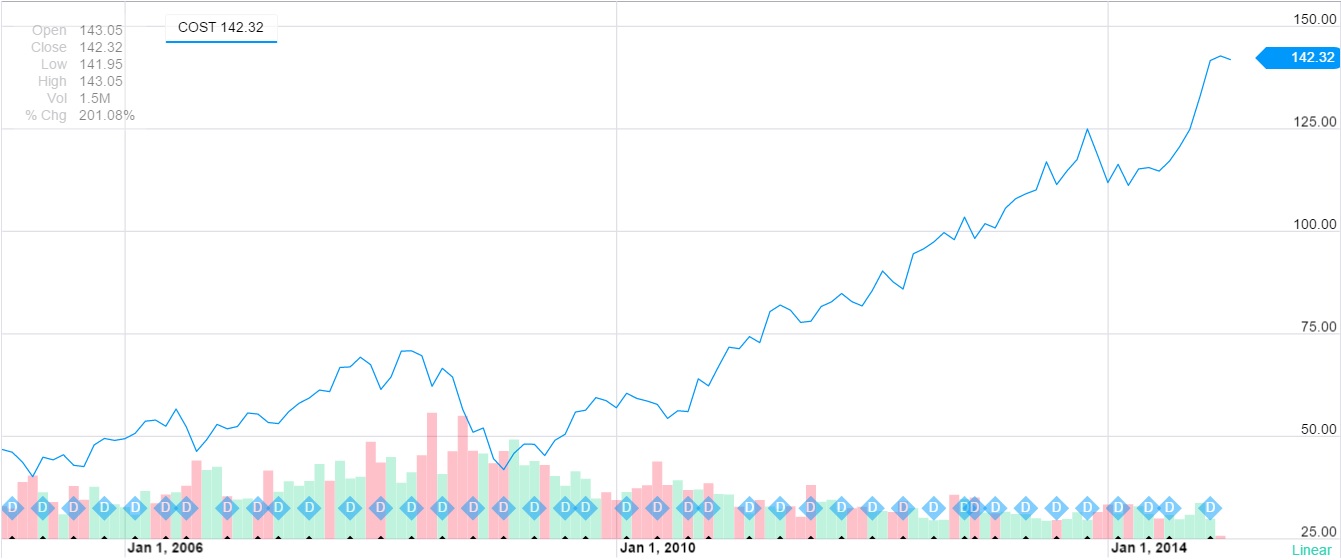
I had just read Jim Collins’ book, Good to Great, (G2G) and kept hearing things about Costco from my dad that sounded eerily like those of “great” companies in Collins’ research. So, like I had invested in most of the G2G companies, I bought Costco stock over the next several months. All in all, I dollar cost averaged my purchases over a six month period. My cost basis for these purchases amounts to about $46 a share.
As dad’s employment continued and age happened, I continued to marvel at how the company worked with him – accommodating his age, restrictions, style, idiosyncrasies and all. I had to assume this was the norm – and saw this in employees’ faces at each shopping trip. I held onto the stock.
Costco sells higher-end merchandise than the normal grocer or home improvement store. I like to refer to Costco as the ‘bulk Target’. Sort of like Sams Club being the bulk Walmart. I’ve enjoyed their Kirkland branded beer, milk, vodka, breads, coffee and much more. A weekly trip is norm for me, and the adage that Costco has a ‘minimum $100 spend’ holds true for me – not because they force it, but because I can usually fill most of my grocery items there. At a great price. With traffic increasing per their annual reports, I held onto the stock.
It was encouraging to see that Costco retained its policy of putting employees first this Thanksgiving. When the doorbusters and Thursday sales were driving America’s craziness, not only did Costco remain closed, it didn’t seem to put notices up about being closed. There were no apologies masked as notices from Costco. It was closed so employees could stay with their families.
I am glad they did… sales up. Customers up. Volume up. Stock up.
Month: December 2014
Solving my projector dilemma with Raspberry PI and XBMC
I don’t watch sports. In fact, no one in my household cares about any sport on TV. So, it is no surprise that we cut the cord (to cable and satellite) many years ago. In fact, the advent of Netflix streaming and Amazon Prime have made it incredibly easy to receive entertainment without a cable bill.
There remains a problem – getting broadcast TV in my home theater. The home theater setup consists of a 12-ft wide section of wall and a HD projector across from it. The projector doesn’t have a built-in tuner, unfortunately, so I can’t watch live TV in the room. The only other equipment in the room is a PS3 for streaming Netflix and Amazon VOD, and playing Blu-ray discs. Most past and present solutions are either gone, woefully inadequate, or so low-rated that I didn’t want to bother spending my energy on them.
I’ve read a lot of XBMC on a variety of platforms, and having used it on the original XBOX, am familiar with it. With some time to spare and a technical problem to solve, I decided to give this a shot last night. An hour of digging for items and some configuration later – it all worked! Here is how:
Hardware used
I didn’t buy anything for this project – everything below just happened to be at home from prior tinkering or active devices. Here is the list –
- Raspberry PI Microcomputer
- HDHomeRun
- 8GB SD Card (though a 512MB would do also
- Raspberry PI MPEG decoder license
- MicroUSB cable and charger
- HDMI Cable
- Wireless keyboard and mouse
- OpenELEC distribution
- MiniTool Partition Wizard
Hardware Preparation
The first step is to get the hardware configured. I snapped the RPI into its plastic case and connected the HDMI cable to a computer monitor. Ethernet connectivity to my network with a CAT5 cable, wireless mouse and keyboard via a dongle, and power using the micro USB cable plugged into a USB charger from an old phone.
To prep the SD card for the OS, I
- put it into the SD slot on my computer and ensured nothing of value was on it
- Then I downloaded and installed the Minitool Partition Wizard and launched it
- Next, I found the SD card in Minitool and removed all partitions from the card
- Then I formatted it with two primary partitions: a 130MB FAT partition (drive letter S) and a second 7.8GB ext4 partition (no drive letter assigned)
- I then marked the 130MB partition ACTIVE.
All this done using MiniTool Partition Wizard. When done precisely as above, you should have the SD card running on your computer, assigned the drive letter S
OS Preparation
This is the easy part. Quite simply, do the following:
- Download the OPENElec distribution as above
- Extract the distribution to a folder
- Copy target\KERNEL to S:\kernel.img
- copy target\SYSTEM S:\
- copy 3rdparty\bootloader\*.* S:\
- copy openelec.ico S:\
I then created a file on the root of S called cmdline.txt that contained the following command on a single line:
boot=/dev/mmcblk0p1 disk=/dev/mmcblk0p2 console=ttyAMA0,115200 kgdboc=ttyAMA0,115200 console=tty1 ssh
That out of the way, I took the SD card out of my computer and put it into the Raspberry PI and connected the power to boot it up. The lights on the RPI lit up and screen showed the normal Linux boot activity. Once complete, I had XBMC interface up and running. Beautiful!
I shut RPI down and took the card back out and put it into the laptop for further configuration.
XBMC Preparation
Here, I decided to test recorded video playback before going to the complexities of live TV. To do this, I hit the Video menu, All files and added my Network Storage Unit (NAS) as a source. Once added, I selected one of my kids’ performances as a video file and XBMC streamed and played it. I then tested various other formats and sizes and everything worked perfectly!
I’ve had HDHomeRun from Silicon Dust running for quite some time as it provides my homebrew PVR with two tv tuners. More about that in another post, but suffice to say that HDHomeRun has run smoothly for a very long time. Though XBMC can use HDHomeRun as a source, there seems to be little available to configure it from within. So, I launched the HDHomeRun software on my Windows laptop first and scanned all channels, selecting only the ones I care about. When done, HDHomeRun had created a series of files in my c:\users\myname\HDHomeRun XBMC TV folder.
We need all these files on the SD card, so I created a new folder at the root of the SD card (calling it Live TV sources) and copied the files to this newly created folder. The files were named like 13.1 WHO-HD.strm referring the a stream of channel 13.1 named WHO-HD.
I ejected the card from the laptop, put it back into the RPI and powered it up.
XBMC Live TV Configuration
This step added the available TV channels to my XBMC. I clicked the Videos, All Files and add source. From the resulting screen, I browsed to the root of the SD card and added the Live TV sources folder. Saving that led me back to the Videos, Files menu from where I clicked on Live TV sources, picked the channel and began hearing audio. No video.
A little more hunting and I remembered that the MPEG decoder license is necessary for live TV, but I had luckily purchased it earlier anyway. To add it to the configuration, I shutdown RPI once again, took the card out and back into the laptop. Browsed on over to the root of the card and loaded config.txt in my text editor (Notepad++). Scrolled down to the License Keys section and added my license key for decode_MPG2, saved the file and exited the editor.
This is a relatively inexpensive license (2 GBP or approx $3.20). Ejected the card, put back into the RPI and booted it.
This time, when I picked Videos, Files, Live TV Channels and 13.1 WHO-HD, I saw crystal clear video and received audio but there was a problem. The RPI, in its default state, wasn’t able to handle the onslaught of 1080p video. Time to add some “power” through overclocking. Again, I shutdown RPI once again, took the card out and back into the laptop. Browsed on over to the root of the card and loaded config.txt in my text editor (Notepad++). Scrolled down to the Overclock mode section and added the following:
force_turbo=1
arm_freq=1000
gpu_freq=333
core_freq=500
sdram_freq=600
current_limit_override=0x5A000020
over_voltage=6
over_voltage_sdram=4
Once again, I ejected the card, put back into the RPI and booted it. Voila! Beautiful, uninterrupted video and audio. Mission accomplished.
Final Configuration
I have since removed the wireless keyboard and mouse and attached a Firefly USB remote to the configuration, though I am certain it too will be replaced with a mobile remote control in near term. The RPI is connected to my amplifier and powered through it as well to remain off when the amp is off. Next time I’m in the home theater for a tornado warning or the latest Downton Abbey release, the RPI will be streaming the video using my HDHomeRun tuners.
Resources Leveraged
My lack of linux knowledge is clear from all the ejecting and rebooting I did… but I had Windows and the bunch of hardware and wanted to make it work. This couldn’t have been at all possible without these fantastic resources –
- Install OpenELEC on Raspberry PI within Windows
- Adding HDHomeRun channels to XBMC
- Overclocking your RPI (will void warranty and can brick your RPI)
- Licensing MPEG-2
Remember, the RPI is an educational computer and the resources on the web are equally transitory and experimental. If you brick your RPI when messing with this – don’t blame the authors but use the experience and experiment on.